From the Military Rifle Journal, May 2001, pages 131 and 134.
Disassembly of the Model 30 rifle or carbine bolt
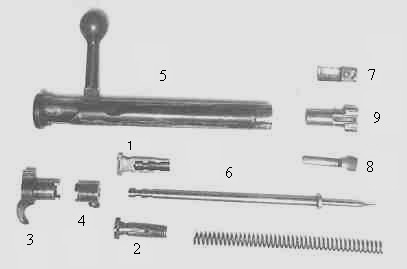
Before disassembling the bolt, check out the part names in the picture below. It is also best to read through the complete process before actually beginning disassembly of the bolt.
In the above picture of the disassembled Model 30 bolt, 1 and 2 are the two halves of the hollow split screw, 3 is the rear half of the bolt sleeve, 4 is the front half of the bolt sleeve, 5 is the bolt body, 6 is the firing pin, 9 is the bolt head, to which is attached the ejector (7) and extractor (8).
- Remove the bolt from the rifle by pulling the bolt rearwards while depressing the bolt stop.
- With the front of the bolt facing you, rotate the bolt head (number 9 in the above picture) 90 degrees to the left and then pull the bolt head (along with the extractor and ejector) out of the bolt.
- A tool in the form of a cylinder 3/8 inches in diameter and 4 inches long with a central hole of at least 3/16 inches in diameter and at least 1 1/2 inches deep is indispensable in proceeding further without damaging the tip of the firing pin. Any piece of rigid metal tubing will do as long as it meets these basic dimensions.
- Place the tool in the front of the bolt, over the firing pin. Grasping the bolt handle in your hand, push down on the tool (rest the tool against some hard rigid surface) compressing the mainspring about 1/4 of an inch.
- At the back of the bolt you should see a disk about 1/8 inch thick with a knurled rim, a slot in the middle, and a spring catch on the rim. This is actually the head of the hollow split screw (numbers 1 and 2 in the picture above) that holds the mainspring and firing pin. Push the spring catch inwards (towards the slot) and unscrew the hollow split screw. The spring catch keeps the hollow split screw from unscrewing, so you will need to keep the spring catch pushed in while you unscrew the hollow split screw. A screwdriver can be used in the slot in the hollow split screw head to start the screw but, once the hollow split screw is started, it is better if you use your fingers rather than a screwdriver. Keep the mainspring slightly compressed by pushing down on the tool so that the hollow split screw will turn more easily. The hollow split screw does not screw into the rear half of the bolt sleeve (the part with the hook safety on it, number 3 in the above picture) but only into the front half (the piece that has the sear nose on it, number 4 in the above picture). So the hollow split screw will not screw out all of the way; instead when the hollow split screw is free of the front half of the bolt sleeve, (you can tell this when pressure on the front of the firing pin will move the hollow split screw up free of the front half of the bolt sleeve) press down on the tool, compressing the mainspring, until the hollow split screw is completely above the rear half of the bolt sleeve (the part with the hook safety).
- The hollow split screw can now be separated into two halves and removed from the end of the firing pin.
- Relieve pressure on the mainspring and withdraw the firing pin and mainspring out the front of the bolt.
- The two halves of the bolt sleeve can now be removed from the bolt body.
Assembly is in reverse order. In assembling the bolt, the hollow split screw should be screwed in far enough so that there is no gap between the head of the hollow split screw and the back of the rear half of the bolt sleeve.